crate.io
Category Archives: Computer
IT Technologies – Container
Container Management
- Kubernetes – Wikipedia
Verwaltet container auf Nodes - https://www.informatik-aktuell.de/entwicklung/methoden/kubernetes-architektur-und-einsatz-einfuehrung-mit-beispielen.html
Docker
- https://docs.docker.com/get-started/#images-and-containers
- A single container running in a service is called a task.
- Docker machine is used to install&control docker engines on virtual hosts.
- A swarm is a cluster of machines running Docker.
- Docker in Ubuntu VM https://www.shogan.co.uk/vmware/setting-up-a-basic-ubuntu-16-04-docker-host-vm/
docker ps list all running containers

## List Docker CLI commands
docker
docker container --help

## Display Docker version and info
docker --version
docker version
docker info

## Execute Docker image
docker run hello-world

## List Docker images
docker image ls

## List Docker containers (running, all, all in quiet mode)
docker container ls
docker container ls --all
docker container ls -aqIT Technologies – Analytics, Machine Learning
Let´s Encrypt
letsencrypt –manualhost www.robertgetzner.com –webroot D:\
D:\ being the http root exposed as Webdav folder on the host
https://github.com/Lone-Coder/letsencrypt-win-simple
Arduino: SD storage: troubleshooting guidline – public worldwide collaboration
[also posted in New fast data logging sketches]
I started a google document to give some overview on ways to troubleshoot SD card usage with Arduino.
“pls have a first look, put your comments in that and then we can decide to create a (sticky?) post in Arduino:Storage to promote this document and the ongoing work on it. As soon as we collaboratively decide, that it`s kind of ready for the wiki, we can copy or link it there. Maybe over time we can identify some named editors keeping the edit access and everyone else can only comment. Let´s see how this works, it´s also the first public worldwide community document editing for me 
And everyone please feel free to edit, modify, restructure whatever you want in this document. In the worst case we can revert to any previous version thanks to the cloud :o)
As this document is stored under my account @ google I hereby reserve all rights to remove any inappropriate, abusive or whatsoever unhelpful stuff that may come in; but of course the technical content remains owned by the community.”
https://docs.google.com/document/d/1lGFHpHPfvfGxSzjU8yo5DBLjO2pM0Bl7nwp85h4pftI/edit?usp=sharing
[gdocs id=1lGFHpHPfvfGxSzjU8yo5DBLjO2pM0Bl7nwp85h4pftI type=’document’]
Arduino writing to SD Card – Next test based on Fat16Libs fast data logging sketches
As all my previous attempts only lead to one sample per 5milliseconds on average, I started to try the library and example from fat16lib, you can find this library here: New fast data logging sketches
My first measurements showed a sampling rate of about 62,5k samples per second (one sample every 16µs). This is a factor 375 better than before, but so far I only wrote the voltage measurement and micros()%256 as timestamp. In my previous tests I wrote micros(), voltage, pulse width and current to the SD, which was around a factor 8 of data. First guess: with the new approach I could achieve an improvement by a factor of 46 – further ADC and digital PIN reading not yet considered.
Next I changed to full ADC 16Bit logging..errr…10 Bit on a 328p 😉
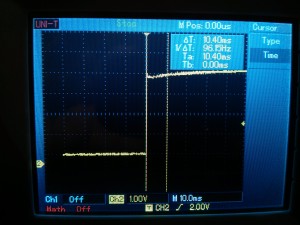
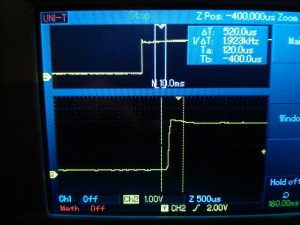
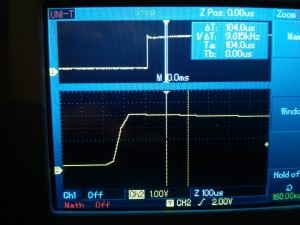
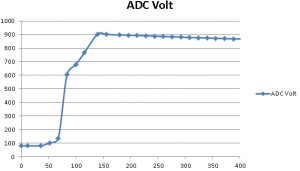
Before coming to the examples, let´s start with the reference, the voltage as recorded with the oszilloscope:
Here we see the voltage jump, which takes about 80µs according to the scope.
Measurements with the Arduino FastLogger
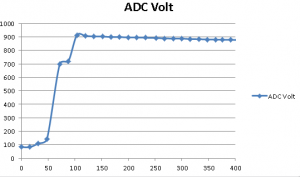
Example 1, Sample interval 25.00µs: ADC Volt is the ADC reading, ie 0-1024 (but as my calibration isn´t correct anyway…this is only for illustration)
Configuration: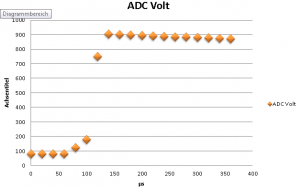
ADC clock MHz: 1.000
Sample interval usec: 25.00
Sample Rate: 40000.00
Record time ms: 2004
Sample count: 160268
Overruns: 0
Example 2, Sample interval 8µs:
Here you can see that the number of overruns dramatically increases and the number of samples is even lower than with the lower sample rate in example 1. We can also see large gaps over the whole duration of the measurement. In the detail of the first phase it shows only little more detail than the measurement in example 1.
Configuration: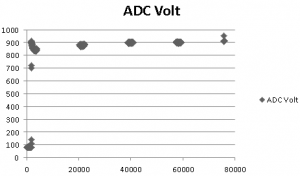
ADC clock MHz: 2.000
Sample interval usec: 8.00
Sample Rate: 125000.00
Record time ms: 2020
Sample count: 27210
Overruns: 164254
Example 3, sample interval 12.5µs:
Still a lot of overruns….
Configuration: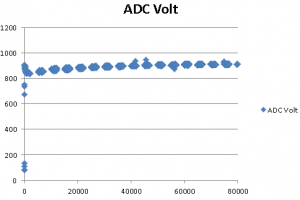
ADC clock MHz: 2.000
Sample interval usec: 12.50
Sample Rate: 80000.00
Record time ms: 2007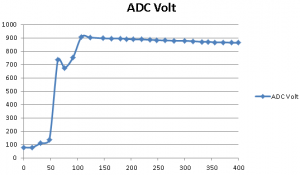
Sample count: 91996
Overruns: 87106
Example 4, sample interval 16µs
Configuration: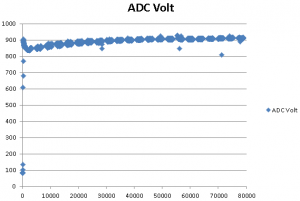
ADC clock MHz: 1.000
Sample interval usec: 16.00
Sample Rate: 62500.00
Record time ms: 2007
Sample count: 122444
Overruns: 47098
Example 4, sample interval 20µs
ADC clock MHz: 1.000
Sample interval usec: 20.00
Sample Rate: 50000.00
Record time ms: 2008
Sample count: 134646
Overruns: 33000
Conclusion
Depending on the SD card and hardware you are using, you need to experiment with the sample rate and need to decide, how many overruns you can accept. In my current test setup 40000 seems to be the best option; here I most often get 0 overruns. Ok, I could now fiddle somewhere betweein 40000 and 50000, but I doubt this will be worth the effort before I test with the real measurement of RPM, voltage and current….
| Sample Rate | Overruns | Sample count | Sample interval usec | ADC clock MHz |
| 40000.00 | 0 | 160268 | 25.00 | 1.000 |
| 50000.00 | 33000 | 134646 | 20.00 | 1.000 |
| 62500.00 | 47098 | 122444 | 16.00 | 1.000 |
| 80000.00 | 87106 | 91996 | 12.50 | 2.000 |
| 125000.00 | 164254 | 27210 | 8.00 | 2.000 |
Way forward
Let´s see, when I want to spend time on this again. Next todo is to combine this with my previous approach, where the interrupt is triggered from the RPM measurement impulses and only in the interrupt voltage and current are measured. I´m wondering how this will work together with the buffering in the fastLogger lib – and if 328p memory will suffice for all together 🙂
Arduino: Great video tutorials on JeremyBlum.com
Jeremy has some great video tutorials for Arduino…..from Basics to GPS logger. Check it out on jeremyblum.com
Experiences with Arduino,SD Card and Memory consumption – Now It works !!!
Getting an SD card to work on my Arduino Uno (I changed boards with my father – Thanks! 🙂 ), was an interesting endeavour during the last days.
I was aware that getting an SD card to work with an Arduino can be a funny experiment. See for example: http://www.ladyada.net/products/microsd/, which is a great tutorial getting started and set up the wiring, but already details some issues, which generally arise around using SD cards with Arduino. As a side note: in parallel I watched the great Arduino video tutorials on http://www.jeremyblum.com/ . Gr8 stuff!
What I tried and didn´t help…..
Each of the following items may have helped, but I´m too lazy to try if taking these preconditions away would break the system:
- Different SD cards, in particular exchanging SDHC card by a non-high speed SD card.
Meanwhile I can report that also SDHC card (<= 2GB) seems to work - Providing external power supply instead of powering from USB only
- Trying different libraries and ways to work with the SD card
Only one of these libraries really worked, see below
What helped – Watch out for memory overflows
Some time during all the testing it occurred to me that all attempts and failures felt very arbitrary.
Short version: I had buffer / heap overflows, because the libraries I first used require lots of memory before even using them during runtime. In particular after initializing the SD card free heap memory partially went down to 200 Bytes. Add to that some function calls increasing the consumed stack size (used for function paramters and local variables) plus lots of nested calls: voila, you get arbitrary behaviour and sometimes the Arduino even resets, for example because the stack pointer (SP) wanders into the used heap.
I had set up a small console program for the arduino such that I could work from the Arduino PC Serial Monitor with commands like, create file, delete file, dir/ls (directory listing etc).
Using this arduino program I can analyze memory consumption and memory leaks induced by the different file operations. In particular ls/dir proved to be a pain in the …memory ;), because of the traversal of directories and files, which by some libs or examples is even done by a recursive algorithm.
Tools for Arduino memory analysis during runtime
The Fat16 library includes a function FreeRam() could maybe have helped, but I found this only after all the other fuzz described above.
The following two references and coding very very helpful to show the current values of SP (StackPointer) and free/allocated heap memory during runtime of my Arduino sketch.
http://playground.arduino.cc/Code/AvailableMemory and http://andybrown.me.uk/wk/2011/01/01/debugging-avr-dynamic-memory-allocation/
Final Setup
Finally my arduino program now works using the Arduino Fat16 library on the root folder only of the SD card and this works stable at least in short time tests and according to my memory usage analysis. As my use case does not include long-term tracking and not lots of files are involved I should be fine with that, but will keep an eye on memory – which anyway is a good idea on a 2K RAM microcontroller 🙂 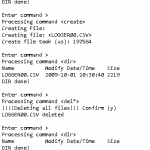
Information and coding sources
- General description of AVR-GCC/Arduino memory management and memory layout. In particular contains documentation on how to use avr-size.exe to determine the static memory consumption of your sketch (of course without memory dynamically allocated during program runtime).
http://www.rn-wissen.de/index.php/Speicherverbrauch_bestimmen_mit_avr-gcc - Fat16 Library, support SD: http://code.google.com/p/fat16lib/
This library also comes with good documentation including class diagram and such. - Runtime memory analysis libraries
http://playground.arduino.cc/Code/AvailableMemory and http://andybrown.me.uk/wk/2011/01/01/debugging-avr-dynamic-memory-allocation/
Future Art ?
I started to read some things about Arduino boot loaders capable to load and start programs from SD card. In combination with approaches for Arduino development environments on Android, I could potentially create sketches on my tablet and directly download them to an arduino (so far no such option seems to exist….).
Loading a new Bootloader to my Diecimila/ATMega168
After somehow I couldn´t upload any new software to my Arduino I learned how to use the Popolu USB AVR Programmer I luckily already had purchased before.
Even worse than that I didn´t immediately recognize that my software updates weren´t loaded to the Arduino, because somehow I didn´t see the upload error messages when working with the Arduino VS plugin; only in the Arduino programming software I saw those messages.
Attention: If you use this description for any of your purposes you do it on your own risk. I shall not be kept liable in any manner and I make no warranties.
Symptoms
- I was getting upload verification errors
- Messages like ‘not in sync’
Root Cause
I still have no clue. My best guess is that I had some voltage glitches from the electronics attached to my Arduino….
Connecting Programmer with PC and Arduino
- Connect Polulu to USB (PC)
The Green light must be constantly on; anything else indicates that the PC connection doesn´t work (e.g. wrong USB driver) - Power up Target Device (in my case Arduino Duemilanove)
- Connect ISP cable from Polulu to Target Device
The yellow led on Pololu must blink
Uploading the Bootloader to the Arduino
As the whole procedure didn´t work from the Arduino IDE, I learned to use AVRDude from the command line. As an additional hurdle, avrdude.conf was missing on my windows installation.
http://www.ladyada.net/learn/avr/avrdude.html was a great help 🙂
I then created the following batch file
Attention: be sure to use the right COMxx interface
” avrdude -p m328p -P COM2 -c avrispv2 -e -U flash:w:bootloader.hex
” avrdude options doku under http://www.nongnu.org/avrdude/user-
manual/avrdude_4.html#Option-“Descriptions
” my Pololu connects on COM15
” -e erases what´s been there before
” -U flash says that the flash ROM shall be written
” -v verbose
rem http://www.geocities.jp/arduino_diecimila/bootloader/files/avrdude.conf
rem Geocities 🙂 LOL. Didn´t know it still exists 😉
rem COM16 !!! Argh. Cost mw 30min to find out I´d used the wrong COM 🙁
C:
cd “C:\Program Files\ArduinoSoftware\Entwicklungsumgebung\Windows\arduino-1.0.1\hardware\arduino\bootloaders\atmega\”
“C:\Program Files\ArduinoSoftware\Entwicklungsumgebung\Windows\arduino-1.0.1\hardware\tools\avr
\bin\avrdude.exe” -C “C:\Users\Robert\Desktop\Arduino\avrdude.conf” -p m168 -P com16 -c avrispv2 -e -v -U flash:w:ATmegaBOOT_168_diecimila.hex
pause
avrdude.conf
As no avrdude.conf file was on my machine, I created the following avrdude.conf
Attention: This must of course fit your programmer and target device.
Update 08/19/14:
had errorswhen writing the bootloader to a 328p : stk500v2_command() command failed rc=-1. When using the -F option of AVRDUDE, it said the device signature was invalid:
avrdude.exe: Device signature = 0x000000
avrdude.exe: Yikes! Invalid device signature.
avrdude.exe: Expected signature for ATMEGA328P is 1E 95 0F
I then added the -B and -i options to the AVRDUDE call:
“C:\Program Files (x86)\Arduino\hardware\tools\avr\bin\avrdude.exe” -C “C:\Program Files (x86)\Arduino\hardware\tools\avr\etc\avrdude.conf” -p m328p -P
com3 -c avrispv2 -e -v -U flash:w:ATmegaBOOT_168_atmega328.hex -i 90 -B 22 -F
Update 08/13/18:
My father has now also ‘repaired’ an Arduino Uno, it worked fine with Atmel Studio 7.0 and these descriptions :
[HowTo] Workaround für Heimgebrauch: Dropbox->Synology Copy via Android Device+Fragen
[27.2.2013] Meanwhile I found a description for a DSM plugin to Sync Dropbox->Synology (unidirectional only). http://otmanix.de/?p=202 It references a beta plugin. Didn´t try it myself yet.
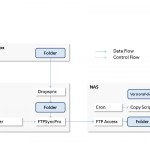
[29.7.2012] mangels direkter Dropbox Integration auf DSM habe ich mir für den Privatgebrauch den Workaround gebastelt wie im beigefügten Bild dargestellt. Evtl. hilft die Idee auch anderen weiter. Mir reicht das so als Backup Lösung, dezentrales Backup läuft zusätzlich separat. Das soll natürlich keine Empfehlung für Produktivbackups sein.
Meine Rahmenbedingungen:
– geringes Datenvolumen in der Dropbox
– Android Tablet verfügbar und liegt tagsüber ohnehin nutzlos zuhause rum
– kritische Daten sind in der Dropbox bereits per Boxcryptor verschlüsselt oder vorher lokal per TrueCrypt, daher kein weiterer Bedarf nach Verschlüsselung
– ich will nicht noch einen separaten PC starten müssen, damit Dropbox Kopien gezogen werden.
Erforderliche Android Apps und Kenntnisse
– Dropsync
– Tasker
– FTPSyncX Pro (läßt sich als PlugIn in Tasker integrieren)
– SSH Zugang zur Synology, Skripte anlegen, Cron Jobs pflegen
Zeitplan für meine Jobs dafür:
Each 30 min. Dropsync Dropbox -> Tablet
10:30 Backup Dropsync Tablet -> NAS
11:00 Create TabletVersion NAS -> NAS
11:30 TabletVersions (incl. Dropsync) NAS -> eSATA ext.
Wer noch eine tolle Möglichkeit kennt a) komplett-Backups eines Android Device zu erstellen ohne zu rooten b) wie man sowas geschickt überwacht, bisher habe ich nur die Möglichkeit Erfolgsmails zu senden, aber eigentlich möchte ich ja genau das umgekehrte Verhalten, nämlich ein Mail oder anderer Alert, wenn etwas schiefgegangen ist. bitte hier ergänzen….
Auch hier gepostet http://www.synology-forum.de/showthread.html?30785-HowTo-Workaround-f%FCr-Heimgebrauch-Dropbox-gt-Synology-Copy-via-Android-Device-Fragen&highlight=Howto+dropbox
